28 April 2011

A royal wedding Cocktail hat!

This is the second mini tutorial from the delightful milliner Chrissie King of Hat Therapy
Chrissie and i met over on Twitter, why not follow her there! @hattherapy


Destruction's!!

1 Cut a piece of simamay {a hat making supply} 12 inch long by 7inch wide on the bias  [that is found diagonally at 45 degrees to the straight of grain]

2 Fold in half by gently pressing down with palm of your hand
3 fold in the ends and press with iron

4 press with iron across whole of piece this will give you a sharp edge
5 fold in half again with palm of hand then with the iron [ not too hot]


6 roll around your rolling pin and making sure it can't escape! Steam with iron then hold it on the rolling pin till cold- This sets the material into a curl

7 gently pull rolling pin out and you will have a curl !!
8 stitch in same colour either by hand or machine along the 3  open sides and press again.
9 stitch a straw disk to a woven headband [all avail from Baxter Hart in Luton]

Add your curl in what ever way you wish and then trim with buttons feathers etc or just add an extra curl in a different size.


hey presto You have a cocktail hat. Perfectly quick for a last minute street party accessory


Chrissie King of Hat Therapy


22 April 2011

Easter bonnet tips!

It's Easter weekend, and many of us will be attending Easter bonnet parades. Why not make one with a twist? Create a fun Easter Fascinator that you can wear again.


I build pieces on a Foam head, but you don't have to have one, just make sure there is a mirror near by so you can keep checking what it looks like on your head.

You'll need something to keep it on your head, a cheap head band or Comb will do. Head-bands are easier to wear, but combs don't mess up your hairstyle.

Collect some materials that inspire you- this piece has lots of vintagey fake flowers that i bought in dalston market.
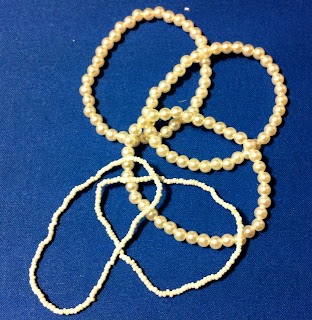
I used some cheap pearl bracelets twisted at the front of the piece
 I also used an artificial bird from cnj florist supplies

Another element was some scrunched up netting at the back of the piece, adding some height

You'll need something to stitch or stick all your bits too. Ready made fascinator bases are easy to use and not super expensive. I used a vintagey tear drop shape from The trimming company, and then covered it with some satin and lace.


  • Using a glue gun( readily available from diy stores) cover your base with fabric
  • Pin all the elements onto your base, and arrange in a pleasing style. I started with the bird and then arrange the flowers around him.
  • Once you are happy with your design, take a few pics from different angles, you need to dismantle the piece a little to actually glue or sew all the elements onto the base so you want to remember what went where!


  • Glue or stitch all your elements onto the base- I started with the flowers and glued, then the bird which i stitched through the wire on his feet. then i pushed the net into the back and secured with a stitch. Finally i stitched the twisted pearls along the front edge of the flowers.

You now need to attach to your comb/headband.

Head band- 
  • Securely glue the outside points of the base to the band at the points it sits on the band, when you line it up on your head.
  • Cut a piece of leather/felt the shape of the base and glue inside and over the headband. This makes it more secure, and hides any stitching inside the base
Comb-
  • Stitch your comb onto a piece of felt/leather that's the shape of your base and sits neatly inside. Just stitch the corners loosely, as the comb needs some movement. 
  • Line up the piece on your head and mark where the comb needs to sit inside the piece.
  • Glue the felt/leather shape inside your base
  • Pin curling a small section of your hair will help anchor the comb when you wear it.
Voila- an easter bonnet fascinator. You can use all kinds of materials, and just let your imagination run wild

Happy Easter- CL x

12 April 2011

Stop press-A sparkly new class

Tie one on- make a man's tie
A beginners class

Held on Saturday afternoons at 2 pm
  • Want to sew but not inspired by cushions or dressmaking?
  • Got a special man in your life that would like you to sew for them?
  • Are you a man looking to start sewing?
  • Got a big wedding coming up and can't find ties you like?
Then this course is just for you!
  • Make a delicious tie in fabulous liberty print lawns, or funky printed cottons. choose from our selection or bring your own with advice from us
  • Learn how to cut out a simple pattern on the bias. 
  • Get to grips with using interfacing, and cutting and sewing precision corners
  • Learn how to use simple hand stitches to create a beautiful luxury finish.
Just in time for Fathers day and the summer wedding season!


All tools, some materials & unlimited tea & coffee are included, just bring yourself! 
2 pm - 5.45 pm. Cost -£49  
Please see our booking terms and conditions before you make a booking


4 April 2011

Fascinator making tips from expert milliner Chrissy King


The royal wedding and indeed wedding season are almost upon us. At the thrifty stitcher we are filling up all our fascinator hen party slots- this year really is the year of the Fascinator or "Whimsy" as many milliners like to call them.

Expert milliner Chrissie King from Hat-Therapy has kindly agreed to guest blog for us once a month. She will be giving us seasonal advice, notes on etiquette for hat wearing at ascot and lots of tips. I can't wait! I'm really grateful to have Chrissie guest blogging, i love her work and she really is a fabulous milliner.


Chrissie's tips for getting started-

*Keep it simple, not too many pieces to stitch together.
 *Pick a colour that can be worn with several items, you can always change the colour of a trim.
 *Use milliners needles as they are fine & sharper than household.
 *Try not to use double thread as it is more inclined to snag and knot.
 *If you think your hair is too fine for a comb then sew directly onto a woven headband.

Suppliers-
  A good place to buy millinery items 
     tel 01582 721 381


Materials
 A really simple and effective material is 'crin'
Made from synthetic fibres it comes in black ivory cream etc and in different widths.


Along one edge you will find a thread that can be pulled gently, once you have decided how much to use. Use this to sew with and create a simple twist.
If you want to add height fold the crin at each end under and fold in half.


Quills make a great statement and are simple to use.
Pick a quill that is not too big.
Cut with a sharp knife at an angle for the desired length then use a nail file to file the end of the quill.
Make a hole with a slightly bigger needle at the point you wish to attach your quill to a crin twist, then sew in a figure of eight with the same colour thread to secure.


ALL THIS CAN BE SEWN ON TO YOUR HEAD BAND. Much easier for a beginner.


The ivory piece of fabric is sinamay or in this case window sinamay. It is very soft and can be pleated as shown.
You can roll the edges between the  thumb and first finger.
Lick your fingers and keep rolling until you get a neat tight edge or you can fold and iron to get a nice edge. Sinamay is a super versatile material, you can use to make all kinds of brilliant shapes.


Good luck everyone!

Chrissie